

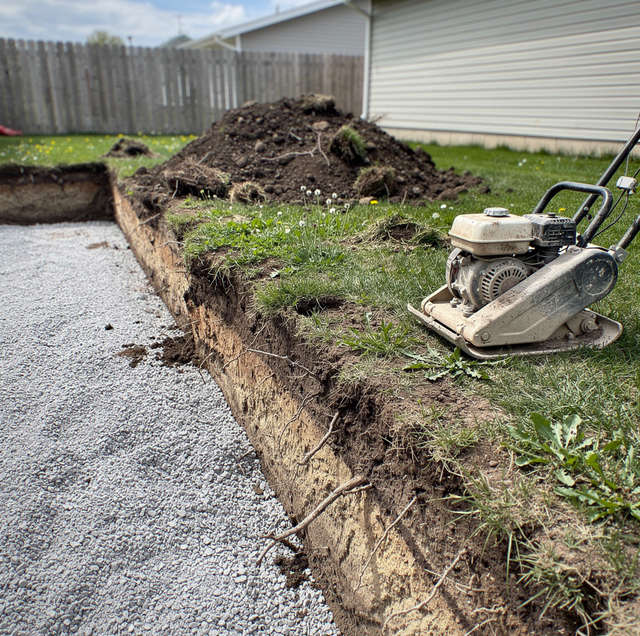
The parts of a retaining wall that determine whether it stays straight go in first, below grade and behind the block, and none of them can be seen again once the soil closes over them. The face you will see every day goes up late in the job, after the digging, base, and drainage work that leave the yard open. Each stage of the build lines up with what the crew is doing and what you will notice from the house:
| Stage | What happens | What you notice |
|---|---|---|
| Site evaluation | Slope, soil, water paths, and anything above the wall line are measured | A walk of the yard and questions about drainage and future plans |
| Layout and utility marking | The wall line is staked and strung; buried lines are located | Stakes, string, spray paint and colored utility flags |
| Excavation | Topsoil and soft ground come out along the wall line and behind it | A trench, a spoil pile and a compact machine on site |
| Base and leveling course | Crushed stone is spread, compacted and screeded level | A flat gray bed in the trench and the thump of a plate compactor |
| First course | The bottom row is set below finished grade and leveled both ways | One row, partly underground, leveled unit by unit |
| Drainage and backfill | Pipe, drainage stone and fill go in behind each course | Stone and fill disappearing behind the face as it rises |
| Reinforcement layers | Where the design calls for them, layers go into the fill at set courses | Rolls of mesh on site for a taller wall |
| Cap | Cap units finish the top of the face | The wall looks complete |
| Final grading and cleanup | Soil is shaped to shed water, and debris is removed | Raked soil, a visible drain outlet, and the yard reopened |
What the Site Evaluation Measures
Before any design is settled, the evaluation reads the yard for each of these, and each reading changes what gets built:
Slope: The height of the grade change and how the ground falls along the length of the wall determine how tall the wall stands at each point and whether its base has to step.
Soil: Both the ground the wall will sit on and the soil it will hold back are checked. Dense, undisturbed ground carries a base differently from loose fill left by an earlier grading job, and clay behind a wall holds water where sand and gravel allow it to drain away. Old fill must be dug out or compacted before the stone goes down, which is why the evaluation looks for it first.
Water: Downspouts, a neighbor's slope, a driveway that sheds toward the wall line, and low spots that stay soft after rain all show where water will arrive. The drain pipe's discharge point is picked at this stage, since it needs somewhere lower to empty.
What sits above: A driveway, a patio, a parking spot, a shed, or a house near the top of the wall adds load on the soil itself. That load, and anything you plan for the space later, belongs in the design from the start, because a wall sized for a lawn behind it is a different structure from one sized for a driveway.
The same visit settles the wall type, whether poured concrete, segmental block or boulder, and that choice follows from those readings; the stages that follow trace a segmental block wall, the type built course by course.
Layout, Utility Marking and Equipment Access
Layout turns the design into lines on the ground. Stakes go in at the ends and at each turn, a string line is pulled to mark the face, and paint follows any curve. Where the ground falls along the length of the wall, the base is laid out in level steps, each one the height of a full course, so every row of blocks sits flat rather than tilting with the slope.
Buried lines are located and marked with colored paint and flags before any digging starts, and that locates service marks for lines owned by the utilities. Lines you or an earlier owner put in, such as irrigation pipe, low-voltage yard lighting, a gas line to a grill or a buried pet fence, do not appear in those marks, and the crew needs to hear about them before the excavator arrives.
Soil and stone move on a compact loader or small excavator, so the job needs a path wide enough for one from the street or driveway to the wall line, plus room for the stone delivery and the spoil pile. Gate width, low branches, overhead wires, septic components, and sprinkler heads along that path all go into the plan.
Excavation and the Buried First Course
Excavation removes more ground than the block's footprint. Topsoil and roots come out along the wall line because organic material compresses and decays under load, and the cut extends back behind the face to leave room for drainage stone and, on a reinforced design, for the fill that the reinforcement reaches into. Soft spots at the bottom of the trench are dug out and replaced with compacted stone until the bottom is firm.
Crushed stone then goes into the trench, is compacted, and is screeded dead level along its length. The base carries every course stacked above it, so any settlement or tilt it develops carries straight up through the face.
The first course is set on that base, partly or wholly below the finished grade, each unit leveled front to back and side to side and aligned to the string.
An open cut beside a foundation, driveway or fence can shear off without warning and bury anyone standing at its edge. The trench and its spoil pile stay the crew's ground until backfill is placed and compacted against the new wall.
Drainage and Backfill as the Wall Rises
Water that collects behind a finished wall adds pressure a drained design does not count on, so drainage is built into the structure as it goes up. A layer of filter fabric lines the cut against the native soil, keeping fine particles from washing into the drainage stone and clogging it. A perforated pipe runs along the back of the first course and out to the discharge point chosen at the evaluation. Clean angular stone fills the space directly behind the block, and on hollow units it fills the cores too, adding weight and a path for water.
From there, the wall and its backfill rise together. Each new course is set; drainage stone is placed behind it; fill is placed behind the stone and compacted; only then does the next course go on. On a block wall, the face never rises more than a course ahead of its backfill.
Where the design calls for reinforcement, layers of it are laid across the compacted fill at the courses specified, extending back into the soil, and the next course and its fill lock them in place. A low garden wall may need none. On a taller wall, or one with a driveway above it, those layers determine how far back the excavation has to extend.
Cap, Grading and Cleanup
The cap course finishes the face. Behind it, the top of the drainage stone is covered with fabric and a layer of denser soil, so rain landing behind the wall runs off the surface instead of dropping straight into the stone and loading the drain from above.
Grading comes next. Soil behind the wall is shaped to fall away from the top, or into a shallow swale that carries runoff toward one end of the wall. In front, the grade slopes away from the base so water does not stand against the buried course. The pipe outlet is left open and visible because it is the only part of the drainage system you can check after the job is done.
Cleanup takes in unused spoil, leftover stone, block offcuts, the stakes and string, and ruts along the equipment path, leaving the disturbed ground graded for whatever planting you choose.
Your Part While the Wall Goes Up
Clear access comes first: an open gate, a driveway free of cars on delivery and excavation days, and nothing stored along the route the machine will take.
Irrigation needs a decision before the dig. Sprinkler lines that cross the wall line will be cut by the excavation, so it helps to agree in advance where they will be rerouted, and to shut that zone off while the trench is open.
Sprinkler heads aimed at the top of a new wall send water into the backfill that the drain then has to carry away. Heads turned or relocated along the wall line keep that added load off the drainage.
Pets and children need to stay away from the work zone. An open trench, a running compactor, and a machine backing across the yard are all hazards at ground level.
Where a permit applies, the application goes to the local building authority through your contractor, and the authority decides what the wall needs.
Once the wall is finished, vehicles, sheds, stacked soil, or heavy planters set on top of it or close behind it add load the design did not include, so anything new planned for that ground is worth raising with the contractor before it goes in.
Frequently Asked Questions
Yes, with one difference: the setback changes the curve as the wall rises. On an outside curve, each course steps back onto a tighter radius, so the top course is the tightest and units may need trimming to fit. On an inside curve, the radius opens as the wall rises, so the base course is the tightest, and the design radius is checked at whichever course is smallest.
Soil left in front of the buried row pushes back against it, and that resistance at the toe helps keep the base from sliding forward under the load behind the wall. A wall set on the ground loses its grip and depends solely on friction under the base. How deep the course sits is set by the wall's height and design.
A plate compactor densifies only a limited depth beneath it, so a thick layer can end up firm on top and loose at the bottom, and that loose zone settles later under the wall. Close to the back of the block, a lighter hand-guided compactor does the work, since heavy equipment against the face can shove the courses out of line.
It can, if it is planned before the upper courses and cap go on. Posts driven or augered through finished backfill can cut reinforcement layers and disturb the drainage stone, so post sleeves or footings are set as the wall rises. A fence also catches wind, and that load at the top of the wall has to be part of the design.
The vertical joints in each course are offset from the joints below, so no joint runs straight up the face. At wall ends, base steps, and corners, that offset leaves gaps that only a cut unit can fill. Cutting concrete block releases fine silica dust, so saws on a wall job can be run wet or with dust collection, and the cutting spot is kept away from open windows and play areas.
Cap units sit on the top course with no soil pressing down on them, so they are bonded to the course below with an adhesive made for exterior concrete masonry. The bead goes onto a clean, dry top course because dust left on the block weakens the bond. On a curved wall, caps are cut to follow the radius so the joints between them stay tight.
Contract retaining wall construction — a site evaluation, a compacted base under a buried first course, and drainage built in behind every course as the wall rises. Golden Stones Masonry serves St. Paul and the Twin Cities. Call (612) 509-0718.