
How to Maintain Chimney Safety After a Rebuild in St. Paul, MN
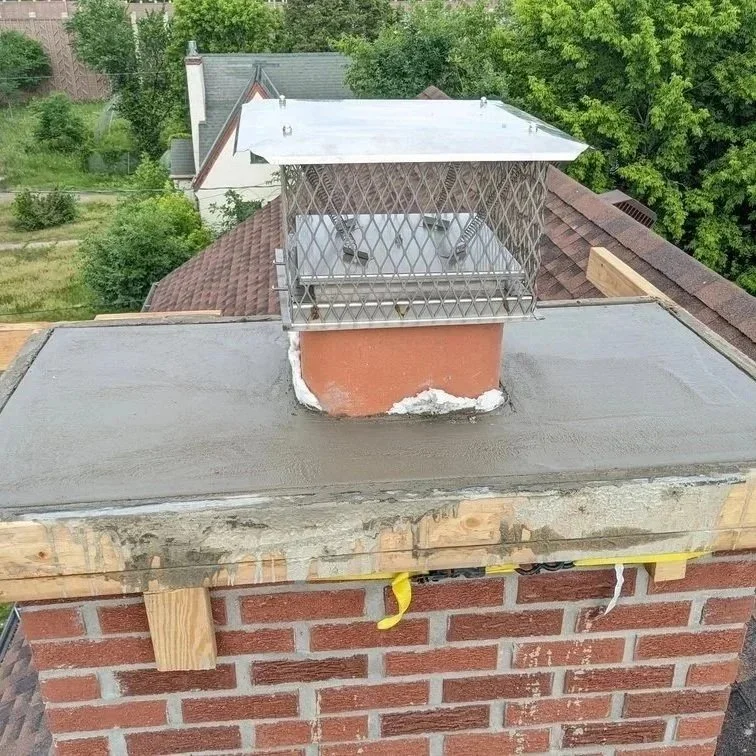
Homeowner inspecting a rebuilt chimney in St. Paul, MN, ensuring proper maintenance to prevent creosote buildup and fire hazards.
Understanding Post-Rebuild Chimney Safety in St. Paul, MN
A chimney rebuild is a major milestone for any homeowner. It restores structural integrity, corrects long-standing safety issues, and brings the system up to modern standards. However, a rebuilt chimney is not a “set it and forget it” feature. In St. Paul, where chimneys work hard through long winters and are constantly exposed to moisture and temperature extremes, ongoing safety maintenance remains essential from day one.
Why a Rebuilt Chimney Still Requires Ongoing Safety Maintenance
A rebuild dramatically improves chimney safety, but it does not prevent normal wear from resuming once the system returns to use. As soon as fires are lit, soot and creosote begin to form inside the flue. During Minnesota’s extended heating season, repeated use accelerates this process. Assuming a rebuilt chimney is permanently safe without inspections or cleanings allows hidden problems to develop quickly.
Different chimney components also age at different rates. Masonry may last decades, while metal caps, flashing, and dampers wear more quickly. Liners can degrade from heat, corrosion, or a single chimney fire. St. Paul’s freeze–thaw cycles, moisture exposure, and frequent use place stress on every part of the system. A rebuild should be viewed as a reset point that begins a new maintenance timeline, not the end of chimney care.
How St. Paul’s Climate Affects a Newly Rebuilt Chimney
St. Paul’s climate is among the toughest for chimneys. Freezing temperatures, heavy snow, ice buildup, rapid freeze–thaw cycles, and spring rains all take a toll. Even newly rebuilt masonry expands and contracts with temperature swings, which can lead to small crown cracks or mortar stress if issues are not monitored early.
Wind-driven snow and ice can clog chimney caps, bend spark arrestor mesh, and speed up rust on metal components. Because chimneys extend above the roofline, they are more exposed than most parts of the home. Regular checks before and after seasonal transitions are one of the best ways to protect your rebuilt chimney from weather-related damage.
Key Components of Your Rebuilt Chimney to Monitor
Homeowners should understand the basic parts of their chimney system and how each supports safety. The chimney liner contains heat and combustion gases. The crown sheds water away from masonry. Bricks and mortar provide structural strength. Flashing seals the chimney where it meets the roof. The cap keeps out rain, animals, and debris. The damper controls airflow and heat loss.
Knowing what these components do helps homeowners recognize early warning signs such as cracked mortar, rusted caps, stiff dampers, or water staining. A basic visual familiarity allows you to document changes and clearly explain concerns to your chimney professional before minor problems become serious.
How Often Should You Inspect and Service a Newly Rebuilt Chimney?
Industry guidelines still apply after a rebuild. Annual professional inspections remain the standard minimum, even for new systems. Frequency can increase depending on fuel type and usage. Wood-burning fireplaces used daily through winter typically need more attention than gas appliances used occasionally.
In St. Paul’s long heating season, most homeowners should plan on yearly inspections, professional sweeping as indicated by creosote levels, and quick homeowner visual checks during the winter months. This routine dramatically reduces the risk of chimney fires, carbon monoxide issues, and unnoticed structural damage.
Local Codes and Regulations That Apply After a Chimney Rebuild
A rebuild should bring the chimney into compliance with current Minnesota and St. Paul codes, but ongoing safety means continuing to meet those standards. Codes govern liners, clearances, chimney height, and venting configurations. If you add a new insert, stove, or appliance later, compliance should be verified again.
Homeowners should keep documentation from the rebuild, including permits, inspection approvals, and materials used. These records are valuable for future inspections, insurance reviews, and home sales, and they help ensure continued compliance if changes are made.
Scheduling Regular Professional Chimney Inspections
What a Professional Chimney Inspection Includes
A professional inspection goes well beyond a glance. Technicians examine the firebox, smoke chamber, flue, liner, crown, cap, masonry, flashing, and roof interface. They look for cracks, gaps, moisture damage, creosote buildup, obstructions, and signs of past chimney fires.
After a rebuild, inspections focus on confirming that materials are aging normally and that no premature failures are developing. Damper operation, clearances to combustibles, and proper appliance pairing are also checked to maintain safe performance.
How Often to Schedule Inspections in St. Paul’s Climate
At least one inspection per year is recommended, ideally in late summer or early fall before heavy winter use begins. Homes that burn wood daily or use multiple solid-fuel appliances may benefit from mid-season checks. Any unusual behavior, such as smoke backup, odd odors, or visible storm damage, warrants an immediate inspection.
Choosing a Qualified Chimney Professional in St. Paul
Look for certified professionals with proper insurance, rebuild experience, and local knowledge. St. Paul’s climate, housing stock, and codes create region-specific risks that experienced local professionals are best equipped to identify. Consistent documentation, clear reports, and open communication are signs of a trustworthy provider. Working with the same company year after year allows trends to be tracked over time.
Questions to Ask During Your Chimney Inspection Visit
Asking targeted questions helps you understand changes over time, not just a single inspection snapshot. Ask how the liner compares to previous years, whether creosote levels are typical, and if early signs of moisture or structural stress are developing. Request photos or video documentation and discuss which maintenance items should be prioritized next.
Interpreting Inspection Reports and Recommendations
Inspection reports typically rank findings by urgency. Cosmetic issues differ from real hazards, such as cracked liners or heavy creosote. Ask for clarification if recommendations are unclear, and seek second opinions for major work if needed. Keeping reports organized helps track gradual changes and supports timely decision-making.
Managing Creosote and Soot Buildup
What Creosote Is and Why It’s Dangerous
Creosote is a tar-like residue from incomplete wood combustion that sticks to flue walls. It develops in stages, becoming more dangerous and harder to remove as it thickens. Even in rebuilt chimneys, creosote begins forming immediately once wood fires resume. Because it is highly combustible, it remains a leading cause of chimney fires.
Burning Practices That Minimize Creosote Formation
Using seasoned, dry firewood is one of the most effective ways to reduce creosote. Hot, efficient fires produce less buildup than smoldering ones. Avoid green wood, trash, treated lumber, or accelerants. Proper airflow, smaller hot fires, and good fuel practices protect both the chimney and liner.
Recognizing Signs of Excessive Creosote Buildup
Strong tar-like odors, visible dark buildup near the damper or firebox, poor draft, or increased smoke in the room can indicate creosote problems. Any popping or roaring sounds during a fire may signal a chimney fire and require immediate emergency response.
When and How Often to Have Creosote Professionally Removed
Sweeping is generally recommended when creosote reaches about 1/8 inch thickness. Many St. Paul households need annual sweeping, sometimes more with heavy use. Professional cleaning addresses areas homeowners cannot safely or effectively reach, such as smoke shelves and flue bends.
Protecting Your Chimney from Moisture and Freeze–Thaw Damage
How Moisture Damages Masonry, Crowns, and Liners
Water enters through cracked crowns, damaged caps, porous masonry, or failing flashing. Once inside, it freezes and expands, breaking masonry apart. Moisture mixed with combustion byproducts creates acidic conditions that corrode liners and metal components.
The Role of Chimney Caps and Crowns in Water Protection
Caps prevent rain, snow, animals, and debris from entering the flue. Crowns act as the chimney’s roof, directing water away from masonry. Even after a rebuild, both should be inspected regularly, as small cracks or loose fasteners can worsen quickly in freeze–thaw cycles.
Waterproofing Treatments for Masonry in St. Paul
Breathable masonry waterproofing treatments help block water while allowing vapor to escape. These treatments extend the life of rebuilt chimneys when properly applied and maintained. Timing and product selection matter, so the application should be handled by professionals familiar with local conditions.
Monitoring for Early Signs of Water Intrusion
Efflorescence, dark patches on brick, spalling, rust stains, and interior wall staining are early warnings. Regular visual checks and photo documentation help professionals pinpoint sources before damage escalates.
Maintaining the Chimney Liner After a Rebuild
Types of Liners Commonly Used in Rebuilt Chimneys
Most rebuilt chimneys use stainless steel or clay tile liners, with some cast-in-place systems. Each has different maintenance needs. Knowing which liner you have helps guide inspections and future appliance changes.
Why Liner Integrity Is Critical for Safety
The liner contains heat and combustion gases. Cracks or gaps allow heat, sparks, or carbon monoxide to reach surrounding structures. Proper liner condition also supports good draft and efficient burning.
Signs Your Chimney Liner May Be Compromised
Smoke spillage, unusual odors, rust flakes, tile fragments, or performance changes can indicate liner damage. Many problems are only visible through camera inspections, which is why professional evaluations remain essential.
Extending the Life of Your Chimney Liner
Safe burning practices, avoiding overfiring, and preventing chimney fires protect the liner's integrity. Any suspected chimney fire should be followed by a comprehensive inspection before further use.
Ensuring Proper Draft and Ventilation
How Chimney Draft Works in a Newly Rebuilt System
Draft relies on warm air rising through a properly sized flue. Weather, house pressure, and usage habits influence performance. Understanding these factors helps homeowners operate the system safely.
Common Draft Problems and Their Safety Implications
Downdrafts, weak draft, and back-drafting can cause smoke and carbon monoxide issues. These problems are especially important during St. Paul winters when homes are tightly sealed.
Steps Homeowners Can Take to Improve Draft
Simple steps like fully opening the damper, preheating the flue, and providing make-up air can improve draft. A professional should always address persistent issues.
When to Consider Mechanical Draft Solutions
Draft inducers or chimney fans may help in certain situations, but must be professionally designed and installed to avoid creating new hazards.
Seasonal Chimney Maintenance Routines for St. Paul Homeowners
Pre-Winter Preparation
Before heating season, schedule inspections, verify caps and crowns, test dampers, and review safe burning practices. Test smoke and CO detectors and stock seasoned firewood.
In-Season Monthly Checks
Quick visual checks during winter help catch early changes. Any unusual findings should prompt a professional call.
Post-Winter Review
After winter, inspect for damage caused by heavy use and freeze–thaw cycles. Spring is an ideal time to address issues before the next season.
Fire and Carbon Monoxide Safety Measures
Smoke and CO Detectors
Detectors remain essential even with a rebuilt chimney. Install, test, and replace them as recommended.
Fire Escape Planning
Maintenance reduces risk but does not eliminate it. Every household should have a practiced fire escape plan.
Recognizing CO Exposure
Symptoms like headaches, dizziness, and nausea during heating season should never be ignored. Suspected CO exposure requires immediate evacuation and professional inspection.
Conclusion: Keeping Your Rebuilt Chimney Safe for the Long Term
A chimney rebuild in St. Paul, MN, marks the beginning of a new maintenance cycle, not the end of chimney responsibility. Ongoing inspections, smart burning habits, moisture control, and attention to components like liners, crowns, caps, and dampers are essential in a freeze–thaw climate. Understanding draft behavior, responding quickly to warning signs, and maintaining safety devices all contribute to long-term protection.
Chimney safety also connects to broader home safety through detectors, fire planning, insurance documentation, and code compliance. By working with qualified local professionals, keeping detailed records, and budgeting for regular upkeep, homeowners can enjoy their rebuilt chimney with confidence while protecting their families and their investment for years to come.
Frequently Asked Questions About Maintaining Chimney Safety After a Rebuild
Most professionals recommend the first inspection after the first full heating season, or sooner if the chimney sees heavy use or shows any unusual behavior.
Yes. New or rebuilt chimneys still accumulate creosote, experience weather exposure, and can develop hidden issues that only inspections can catch early.
Homeowners can perform basic visual checks and safely remove ash. Sweeping, liner inspections, roof work, and code evaluations should always be handled by professionals.
Long heating seasons, frequent freeze–thaw cycles, and heavy snow increase stress on chimneys. St. Paul homeowners benefit from strict annual inspections, vigilant moisture control, and seasonal visual checks.
Golden Stones Masonry is a licensed and insured expert, offering chimney repair, chimney rebuild, and foundation masonry repair solutions to St. Paul, MN, residents. Our professionals deliver reliable and long-lasting results that come with a 10-year warranty. We take pride in our transparent process and fair and honest pricing. Call now to book a service appointment.